
These instructions are also available as a PDF document.
The installation of the HKL-3000 software is now guided by the installation program. The HKL-3000 installer can be obtained from HKL Research, Inc. by clicking on the link:
and signing in with a generic username hkl3000ftp. The password can be obtained via the Automatic Password System or by e-mail to support@hkl-xray.com (established users only).
The installer is provided as a compressed file, and the file name indicates the system for which the installer will operate. Three versions are currently available, and the installation process is essentially the same for Linux and Mac. Please see a separate chapter on the installation on Windows.
- HKL_installer_v7##-Linux-x86_64.tar.gz
- HKL_installer_v7##-Mac.zip
- HKL_installer_v7##-for_Windows10.zip
HKL can be installed in one of two ways, depending on how many people need access to it. If only one person will run HKL-3000, then that user should install the program. Multi-user installations require administrative (root) privileges. The installer program lets you choose the installation type and will guide you through the installation process, including specifying where the program should be installed.
Unpacking
You may download and unpack the installer anywhere on your system. Unpacking is dependent on the particular desktop environment, but usually you can open the location of the downloaded file in the graphical file manager, right-click the icon for the downloaded and select “Extract here (or in a user-defined location).”
Alternatively, unpacking can be done from the command line. Assuming the user ‘joe’ downloaded the version 721 installation package to the directory /home/joe/Downloads, the following commands can be used to prepare a multi-user installation:
sudo mkdir /usr/local/HKL
cd /usr/local/HKL
sudo cp /home/joe/Downloads/HKL_installer_v721-Linux-x86_64.tar.gz /usr/local/HKL
sudo tar xvfz HKL_installer_v721-Linux-x86_64.tar.gz
For a single user installation:
mkdir /home/joe/HKL
cd /home/joe/HKL
tar xvfz /home/joe/Downloads/HKL_installer_v721-Linux-x86_64.tar.gz
Extracting the compressed file will create a folder (e.g. HKL_installer_v721-Linux-x86_64) that contains the installer, file README.txt, the executable file access_prod, and a folder named “setup_files”. README.txt is meant to serve as installation help in a condensed form. Access_prod is a program that gathers information necessary to generate a license key.
Obtaining a License
You need to run the program access_prod to obtain the HKL-3000 license for your computer. In some Linux distributions, this can be done in the graphical file manager by navigating to the extracted folder and double-clicking the access_prod’s icon; alternatively, access_prod can be run from the command line:
sudo /usr/local/HKL/HKL_installer_v721-Linux-x86_64/access_prod
in case of a multi-user installation, or
/home/joe/Downloads/HKL_installer_v721-Linux-x86_64/access_prod
in case of a single-user installation.
Access_prod can email the output to HKL Research (provided the e-mail system is installed) or you can email the access_prod results (stored in the info file) to hkl@hkl-xray.com. For more details, refer to the HKL Research web page: http://www.hkl-xray.com/license-key.
Installing CCP4
HKL-3000 requirements (CCP4 and SHELX) and optional programs (i.e., ARP/wARP) should be installed before running the HKL installer. Presently, CCP4 includes SHELX distribution, and all necessary programs can be downloaded from:
http://www.ccp4.ac.uk/download
Instructions for CCP4 installation are available at:
http://www.ccp4.ac.uk/download/installation.html.
Typically, CCP4 is installed in the /opt/xtal directory, but it can be installed in any directory. CCP4 should be available to all users for a multi-user installation of HKL-3000.
Running the HKL installer
![]() Using a graphical file manager: Navigate to the unpacked directory and double-click the installer icon or type “./HKL_installer.” For a multi-user installation, you need to run the installer as root. In some graphical managers, you can right-click the installer name and select “Open as Administrator,” or you can use the command line (see below).
Using a graphical file manager: Navigate to the unpacked directory and double-click the installer icon or type “./HKL_installer.” For a multi-user installation, you need to run the installer as root. In some graphical managers, you can right-click the installer name and select “Open as Administrator,” or you can use the command line (see below).
In a single user installation, HKL can be installed in any directory to which the user has write access. For multi-user installations, the default location for HKL-3000 is /usr/local/HKL. This directory will be created by the installer if needed.
Alternatively, you can start the installer from a terminal window. For a multi-user installation, type:
sudo /usr/local/HKL/HKL_installer_v721-Linux-x86_64/HKL_installer
For a single-user installation, type:
/home/joe/HKL/HKL_installer_v721-Linux-x86_64/HKL_installer
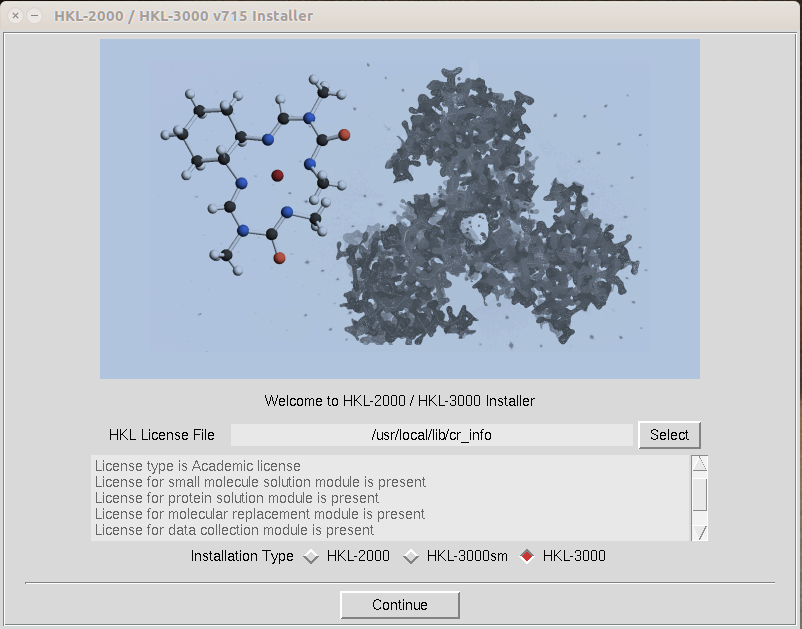
The HKL installer will first verify that your license key is valid. The traditional location of the license key file (cr_info) is /usr/local/lib (on some systems, you may need to create this directory).
The Installation Type buttons allow you to choose the HKL version you would like to install: HKL-2000, HKL-3000sm, or HKL-3000, provided you have a license for it and the appropriate license key. HKL-3000sm includes additional features for small molecules. Click “Continue” to view the version-specific license agreement. You must accept the license conditions to proceed.
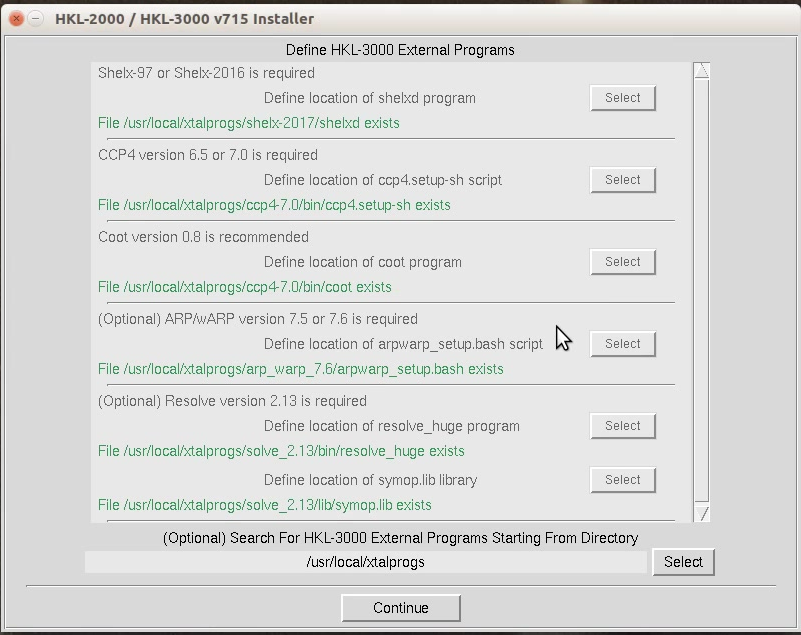
The screen below will let you choose whether you want to create a new HKL installation or upgrade an existing installation. If you have selected HKL-3000sm or HKL-3000, a dialog box will appear requesting the location of the external programs used by HKL-3000. The installer may be able to determine the location of some of them based on your environmental variables. If you still need to select some programs, the installer can search for the files for you. Use the “Select” button at the bottom of the dialog to select the parent directory that contains one or more of the necessary programs. In the example shown below, all of the files not defined by system variable were found using the parent directory “/usr/local/xtalprogs”.
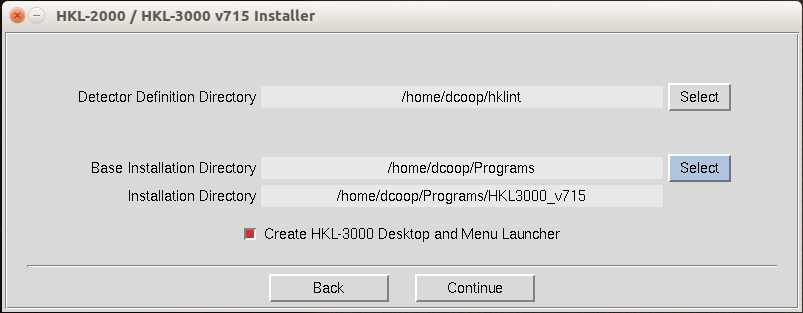
The next dialog allows you to specify the program location and the detector definition directory. The default locations are /usr/local/HKL and /usr/local/hklint. You can change them if you want to use a different directory or you do not have write permission for these directories. The default folder for HKL will include the version number. The following example uses non-standard locations that would not require root privileges.
The installer will then check if you have permission to write to these directories and run checks to verify that the external programs are correctly installed. If everything looks good, click “Install” to finish the setup.

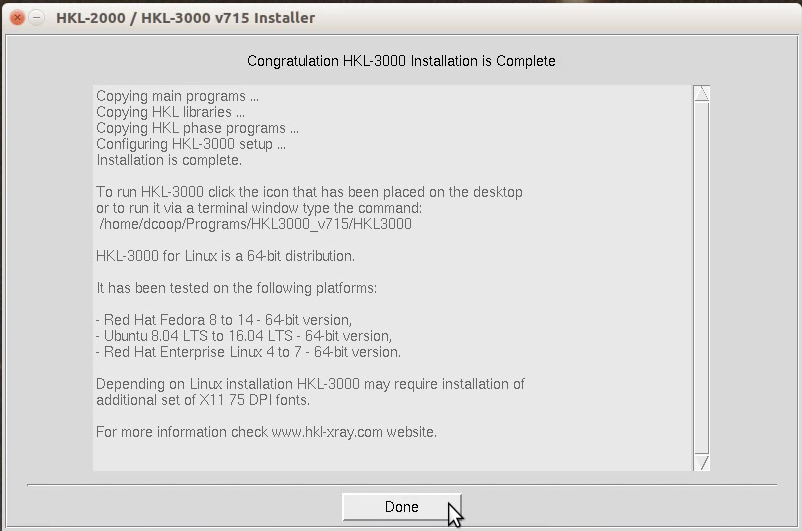
If you let the installer create an icon, you can now use it to launch HKL-3000.
Alternatively, HKL-3000 can be started from a terminal window by typing:
HKL-3000
(if the program has been installed in /usr/local/HKL)
or:
/home/joe/HKL/HKL-3000
(if the program has been installed in /home/joe/HKL).